Enter new sprinklers
Symbol:

Set sprinkler in your project.
After the command call, the following input options appear in the properties palette:
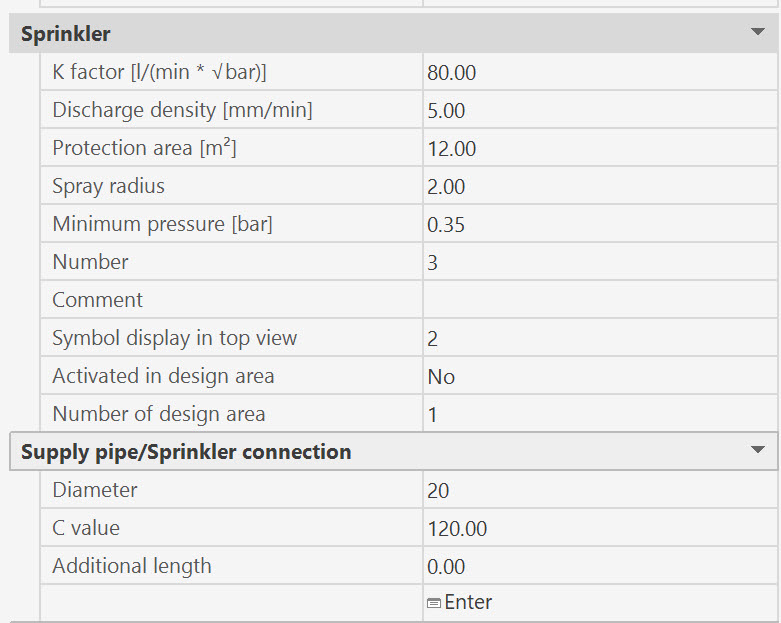
Each sprinkler receives the properties specified here.
During the command sequence the data can be changed at any time.(*)
The following line appears in the command line of the CAD program:
Specify reference point or [Undo/Branch pipe]:
With the following options:
- U : Undo last sprinkler input (within this function call).
Immediately after calling the sprinkler input command, this option has no effect.
With this option, the last step of the sprinkler input is undone.
The Undo option can be repeated until the state at the beginning of the sprinkler input is reached again.
reaching this initial state, the option has no effect.
- B : Input of a sprinkler, starting with the insertion position of the sprinkler on the branch pipe.
First, the branch pipe on which the sprinkler is to be inserted must be selected.
Select branch pipe or [Undo/Reference point]:
The point from which further entries are made is determined at the same time as the branch pipe is selected.
If the selected point (for selecting the branch pipe) is closer to the starting point of the branch pipe, the further entries refer to the starting point, otherwise to the end point of the branch pipe.
After that, the distance of the sprinkler insertion point from the start-.
Specify distance from start point <0.0>:
or from the end point of the branch pipe.
Specify distance from end point <0.0>:
is requested.
The insertion position of the sprinkler is on the branch pipe and is at the distance just entered from the start or end point of the branch pipe.
If desired, the sprinkler can also be inserted several times on this branch pipe.
Enter the number of sprinklers to be inserted on the branch pipe <1>:
If more than one sprinkler is inserted, the spacing of the sprinklers is also entered
Enter the distance between the sprinklers:
The input of the distance is only accepted if all sprinklers fit on the branch pipe, i.e. the following must apply
Distance from starting point + (number of sprinklers - 1) x distance of sprinklers ≤ length of branch pipe.
- R: <Reference point> : Input of one or more sprinklers, starting with the sprinkler position.
The position of the sprinkler is entered as a relative point (enter a point).
After input the following menu appears:
Enter number of sprinklers or [Distance] <1>:
One can now specify the number of sprinklers to be inserted or, with the Distance option, a distance from the reference point for the first sprinkler.
If you choose the distance option, you will be asked for the x-, y- and z-difference and will end up in this menu again.
If you specify more than one sprinkler, the distance between the sprinklers must be specified.
Enter distance of sprinkler:
Then the insertion of direction of sprinkler along branch pipe or in the room.
Specify the direction in which the additional sprinklers are inserted [X/-X/Y/-Y/Z/-Z/Angle/Space angle] <Y>:
Finally, the direction of the sprinkler must be entered (Input of a direction)
Specify direction of the sprinkler [X/-X/Y/-Y/Z/-Z/angle/space angle/sprinkler supply Pipe] <-Z>:
How to enter a sprinkler supply pipe is described in the chapter Set sprinkler connection.
After drawing the sprinkler(s), the prompt will reappear with the option to enter additional sprinklers.
Sprinkler input can be terminated by pressing the <RET> key.
(*)
If the value of the CAD system variable COMMANDPROPERTIES is 0, nothing is displayed in the properties palette, instead the properties dialog of the sprinkler (properties dialog of a sprinkler) is displayed at the end of the command.